Blog

Review: Chain L bicycle chain lube

chain L bicycle chain lube

Until a few months ago, I have consistently only used either Tri Flow bike lube or Boeshield T9 bike lube on my chain, either in the spray can form or from the drip bottle. What I liked about those lubricants is that they are both easy to apply, and they are also very light lubes. So after you spray them or drip them on, you can run your chain through a rag by pedaling backwards, and your chain will be really clean, but still very quiet and well lubricated with Teflon.

I was pretty happy with that setup until I read a raving review of Chain L high mileage formula chain oil on the Road Bike Rider site, where the author claimed that he was getting a lot more life out of his chain as a result of using this lube, and that he only rarely had to re-apply it because it lasted so long on the chain. The review convinced me to try it, so I bought some.

I haven’t been using Chain L long enough to verify if it really increases chain life like the other review says, but I am hopeful that I will see similar results.

I have been able to verify one of the other selling points of Chain L though — the fact that it lasts a lot longer between applications, which means that you don’t have to oil your chain as often to keep it lubricated. Even if my chain doesn’t last any longer, I am happy with how I can spend less time lubing my chain and more time riding.

The biggest issue for me with this chain oil versus what I was using before is that it was a major switch for me from a really light Teflon based lube to a very heavy oil based lube. I was worried that such a thick oil would end up attracting a lot of dirt and make my chain disgusting and filthy. I really liked how my chain would stay relatively clean with Tri Flow or Boeshield T9 and didn’t want to lose that benefit.

The good news is that my chain still stays clean if I apply it correctly, the way the author of the other review of this product helpfully described.

Basically, when I apply Chain L, I will put a drop on each link of the chain, one link at a time. It takes a little bit longer, but it prevents you from wasting oil and making a thick, oily mess.

Next, I’ll let the bike sit there for 10 minutes or so, so that the really thick oil has time to actually penetrate all the links of the chain.

And then I’ll finish up by getting out a rag and holding it over the chain while turning my pedals backward, removing all of the thick excess oil.

After going through this process, you end up with a clean, well lubricated chain that stays pretty much as clean as my Tri Flow setup from before. I also noticed that my chain runs significantly quieter compared to lubing with Tri Flow or T9, which leads me to believe that it is better lubricated and possibly extending the life of the chain just as the product claims.

I also get much, much higher mileage between adding lubricant to my chain. When Tri Flow or T9 starts to wear off, you can hear your chain start to get louder. (Which really means that I am going much too long between applications.) With Chain L, I am not running into that issue.

One thing I wonder about is how a heavy lube affects the speed of the chain versus a light lube. Perhaps you’ve been reading that series of articles on Velonews about the guy who tests every type of lube to see which one is the fastest, claiming that you can get “free wattage” by using a really fast lube. I don’t ride time trials, so I don’t really consider it important. Chain life is more important to me than a tiny incremental speed improvement that probably doesn’t even pan out in real riding. But I do still wonder how it would rank!

You have to love the completely generic looking black and white label and plain bottle with Chain L. It makes you feel like you’ve discovered a secret stash of some special lubricant that they only use on military drones or something, and someone has given you a small bottle that they poured out of a 50 gallon drum. Well, it makes ME feel that way, anyway.

I am very happy with this chain oil, and I recommend trying it. It’s a cheap way to possibly make your expensive chain last longer, and it works well even if the extended chain life part doesn’t pan out.

Anyone else using Chain L? If not, what’s your favorite bike lube, and why? Leave a comment!

Review: Giro Apeckx road bike shoes

Giro Apeckx Road Biking Shoes review

Some time last year I developed pain in the ball of my left foot. I was riding high end Shimano road shoes with a carbon fiber sole, and high end SIDI mountain bike shoes with a carbon fiber sole. I started out by shifting my cleat position from way up at the front of the shoe (as a result of a bike fitting, trying to get my knee in the right spot over the pedals) back to the back of the shoe, and that helped. But I was still feeling pain with my road shoes after the first 45 minutes or so.

I was about to make an appointment with a doctor or a podiatrist, when I decided that I would buy some new shoes first to see if that would help.

I typically buy shoes on the high end, but I was thinking that maybe the stiff carbon sole was part of my problem. Also, I was worried about spending $300 plus on another pair of shoes, only to discover that it didn’t make any difference compared to my expensive Shimano shoes that I already owned.

So I went to my local bike shop and tried on all of the different road shoes that they had in stock that day in my size. I was looking for comfort first. The ball of my foot was pretty sensitive, so I could get a pretty good feeling for which ones might work just trying them on. I kept gravitating back to Giro road shoes, which had a very comfortable foot bed.

After bouncing back and forth between the $225 Trans shoes and the $150 Apeckx, I decided that it was too much of an expensive gamble to spend more than $200 and bought the Apeckx, even though they have a nylon sole instead of a carbon fiber one.

I’ve been riding Giro Apeckx road bike shoes for almost six months, and I am happy with the shoes. Most importantly, my foot is slowly getting better. I don’t feel any pain while I am riding anymore, although I can sometimes feel a small amount of discomfort on the ball of my foot. But that is more with my mountain biking shoes than with my road shoes.

giro apeckx shoe soles

These shoes are not as stiff as my $350 Shimano Pro Tour shoes, but they are a little bit lighter according to manufacturer specs, at 285 grams for size 42.

If my foot heals completely, I plan to eventually go back to my more expensive Shimano shoes (keeping a close eye on whether they were the source of my problem in the first place). But as far as comfort and fit goes, I am completely happy with these Giro shoes. I’ve only had them six months, but they still look like new and are holding up very well. I have probably ridden them 3,000 to 4,000 miles so far.

Even though they don’t feel as stiff as my old carbon shoes, I have to say that these Giro shoes still feel acceptably stiff and give me a completely acceptable power transfer when I am pedaling. I have not felt that they have been a noticeable disadvantage for me when riding hard. In fact, I would say that they have given me an advantage since they are comfortable and do not cause pain.

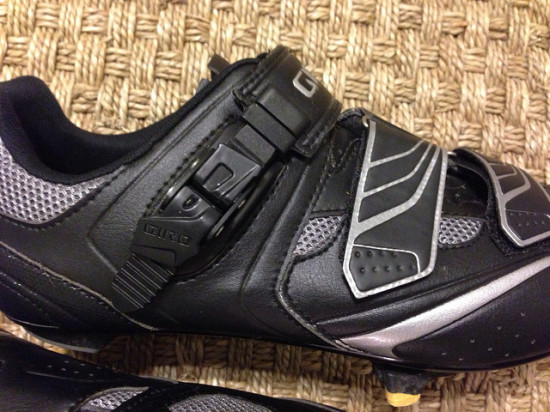
Giro Apeckx side buckle and velcro

The shoes come with two velcro straps and one ratcheting buckle. The buckle is very easy to use and release. I typically keep the bottom strap closed all the time, and only need to release the buckle and middle strap to get the shoes off. The buckle is very secure, and the shoes stay on just fine when you are hammering or sprinting with them.

I’ve mostly had them in cold weather months, so I’m not sure how well they will vent in the heat of the Texas summer, but they have plenty of mesh venting and should be fine.

Here’s what Giro says about the shoes:

Classic style, with performance features and value that can’t be beat. The Apeckx combines a supple microfiber upper with a stiffest-in-class DuPont Zytel nylon outsole that has been engineered to rival the performance of premium composite outsoles, with greater fatigue resistance than traditional nylon soles. A supportive EVA footbed with Aegis anti-microbial treatment enhances comfort and fit, which is adjustable via the classic combination of a micro-ratcheting buckle and two straps. Plus, it’s built on the same performance last as our best shoes, so you get the same unrivaled fit that has made Giro the fastest growing brand of cycling shoes on the market.

Overall, I give these shoes a good rating and recommend them to anyone looking for a comfortable, durable shoe in the $100 to $150 price range.

Anyone else riding these shoes or considering them? Leave a comment with your opinion about them!

Review: Park Tool PCS-10 Home Mechanic Bicycle Repair Stand

Park Tool Bike Stand PCS-10 review
I am a terrible mechanic. I can do simple things like adjust my derailleurs (most of the time) and clean my chain. But when it comes to anything like adjusting my bottom bracket or headset, I go to the bike shop.

Even though I don’t do extensive work on my bikes, I found that when I did try to work on them it was a horrible, uncomfortable time of bending over or sitting on my knees in the driveway, or trying to awkwardly hold up my rear wheel with one arm while I pedal with my hand using the other. As if my poor mechanical abilities weren’t frustrating enough, you can probably imagine how easy it is to lose your temper when your bike falls over on you when you are trying to work on it.

Problem, meet solution. It’s the $159 Park Tool PCS-10 portable bike stand.

I bought this bike stand because it breaks down into a long, pole shaped thing that you can easily bring in your car to a bike race, or store in your closet or garage without taking up a ton of space. I don’t work on my bike that often and my garage is tiny, so I definitely didn’t want a big, permanent stand.

The PCS-10 only takes a minute or less to unfold and set up. It’s made of a heavy, thick metal, so it is also very substantial feeling like most of the high quality bicycle tools that come from Park Tools.

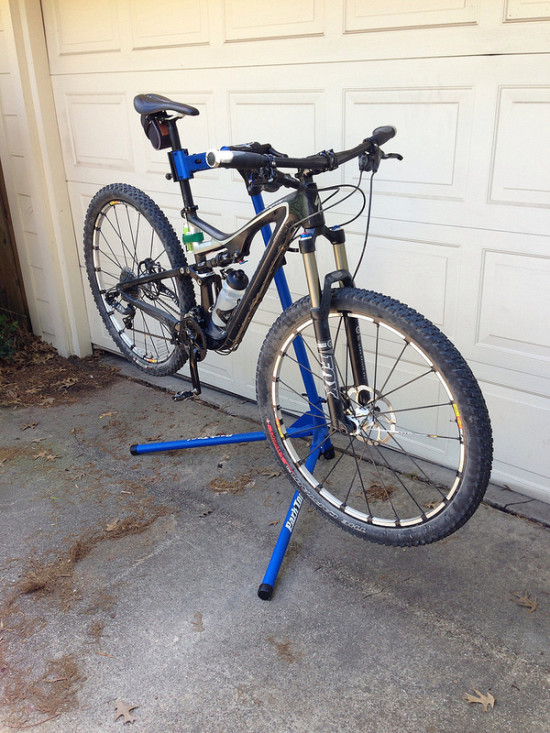
As you can see from the photo, it’s stable and sturdy enough to easily hold a big, dual suspension 29er. So you don’t have to worry about it hurling your bike to the ground in a crucial moment.

parktoolstandfolded

One of the features that I really like about this bike stand is that the clamp is designed so that it will grab a regular frame or seatpost (as in round shaped), but will also grab aero seatposts and unusual carbon shaped frames.

Just like one of those mechanic repair stands at the bike shop, you can rotate your bike while it is on the stand and then lock it down in whatever position you need so that you can easily get to the part of the bike that you want to work on. There is also a quick release thing that lets you raise and lower the stand so that your bike is at the most convenient height for you to work on.

Here’s what the manufacturer says about the PCS-10:

The PCS-10 has all the features of our popular PCS-9 Home Mechanic Repair Stand but with special upgrades to make set up, take down, and use faster and easier. The PCS-10 works well with many recumbents and bikes with odd shaped tubing.

– Cam-type clamp allows single action clamping of tubes 7/8” to 3” (24mm to 76mm). Clamping pressure is fully adjustable and jaw covers are replaceable (part #1185K)
– Quick release height adjustment (39” to 57”, 99cm to 145cm)
– Folds to 41” (104cm) for portability and storage
– Three-point leg system with reinforced center yoke for superior stability
– Composite top tube for smooth 360-degree clamp rotation
– Spring buttons lock folding legs in place
– Exclusive receiver pod accessory system integrated into the top tube and height adjustment collar to allow easy installation of PTH-1 Paper Towel Holder

There might be cheaper portable stands out there, but I found this stand to be a very good value at $169. It is so nice and sturdy and heavy and solidly built that I know it will last for as long as I end up keeping it.

Do you use a bike stand, or work on your bike without one? If you have a stand, which brand are you using, and is it good? Leave a comment!

Review: Arundel Dual bicycle seat bag

Arundel Dual Bicycle Seat Bag review

I bought the Arundel Dual model bicycle seat bag in 2012 when I was looking for a bag that was just the right size to carry the essentials for the Leadville 100 race, without adding anything extra.

It’s just large enough for me to carry a really big 29er spare tube, a Park Tool tire boot, a glueless tube repair kit, three plastic tire tools, a 20 gram CO2 cartridge, an Innovations Air Chuck Elite CO2 inflator and a SRAM master chain link. (If I were using it on a road bike, I would be able to put two road tubes side by side in the same space as the big 29er tube.)

That’s a lot of stuff, but you can see that the bag is still compact and doesn’t take up a lot of space behind the seat. It has 27 cubic inches of space, according to the manufacturer.

I was drawn to this bag because of the really solid looking construction, and the size. I knew a guy who used the tiny Arundel Uno on his road bike and was impressed by how little space it took up under his seat and how nice the bag itself looked. So when I spotted the Dual version in my local bike shop, I bought it.

And speaking of solid construction, you can see that patch of leather on the top side of the bag, right in the perfect spot where it hits against the seatpost. Without that leather patch, you might eventually wear a hole in your bike bag from it moving back and forth as you ride. But that little spot of reinforcement makes the bag super tough just where it should be. It’s a great design detail.

Arundel bike bag rear view

The bag attaches to the seat with a thick, well made velcro strap that goes into a metal ring. Again, these are the details that make it a durable bag. The bag zips open in the longways center of the bag, and the zipper covers at least 50 percent of the bag so that you can open it really wide to get stuff out, or carefully load it the way you like it. When you zip up the zipper where the bag is closed, it ends up on the top side of the bag, just under the seat where it is protected from zipping back open on its own. The zipper has a long nylon-looking pull that is easy to grab with your fingers.

Although I am using this seatbag on my 29er, it would be just as suitable for a road bike or cyclocross bike or any other situation where you either want to carry two road tubes and some tools, or one big mountain bike sized tube and some tools.

I really like my Arundel Dual bike bag, and I recommend it for anyone who needs a “small side of medium” sized bag that will hold all your stuff and also hold up over time.

Review: Specialized Henge Comp mountain bike seat

specialized henge comp saddle review

The Specialized Henge Comp mountain bike saddle is one that came installed on my 2012 Stumpjumper FSR Carbon Comp 29er dual suspension mountain bike.

I am a fan of Specialized saddles in general, and the Henge is a saddle that has been comfortable and held up for me over the past year or so of using it. I successfully completed the Leadville 100 mountain bike race on this saddle, which took me more than 11 hours to finish. If you can ride a saddle for 11 hours and still like it, it’s a winner.

Specialized saddles come in three different widths. The mountain bike came with the medium width saddle, which also happens to be the width that I am supposed to ride. These saddles are designed to prevent any kind of problems with restricted blood flow, and I do not suffer from any kind of wiener sleepage when I ride it.

I almost bought a Phenom Expert saddle for this bike, because I use that saddle on my cyclocross bike and love it. But I didn’t get around to it, and the time kept getting closer to the Leadville race until I didn’t feel comfortable making any last minute changes to my bike. The Henge is only 40 grams heavier than the Phenom Expert, (280 grams versus 240), and it has more padding. So I figured it wasn’t worth worrying about to swap it out.

Overall, I give this saddle a good rating when it comes to comfort and durability. It’s a great mountain biking saddle that you can’t go wrong with.

Here’s what Specialized says about the saddle:

The Henge is a perfect XC or All-Mountain saddle with its anti-snag rounded tail, broad, flat midsection for added control, and carbon reinforced shell tuned for moderate flex.

  • Patented Body Geometry design is lab tested to assure blood flow to sensitive arteries

  • Lightweight and supportive PU foam for increased comfort over longer rides

  • Stiff, carbon-reinforced shell for longevity and all-day riding efficiency

  • Flush mounted scuff guards for increased durability

  • Light and super durable hollow Cr-Mo rails

  • Tough, light and water resistant Micromatrix™ cover


Have you ridden this saddle? Leave a comment with your opinion!