Best Clincher Bicycle Tire for a Road Bike: 2013 Continental Grand Prix 4000 S

Continental Grand Prix 4000 S review

Looking for the very best road bike tire, period? In most cases when you talk about bicycle tires, you have to be more specific and say something like the best tire for training, or the best tire for racing, or the best tire for puncture resistance. But with the Continental Grand Prix 4000 S, you really get the best tire for road bikes, period.

I have been riding Continental tires since the late 1980s, and in my opinion they have always made the best all around road bike tires. Every time I’ve tried out something else that I think is better, I’ll usually get 3 flats in a week and give up in frustration and throw away whatever tire it was that I was trying.

The Grand Prix 4000 S is the flagship top of the line clincher tire from Continental. If it isn’t the most expensive clincher tire that they make, it’s up there near the top.

I used to ride Continental Gatorskins, because I would never, ever flat with them. I detest changing flats. In my opinion, any weight savings from a tire are worthless if you end up flatting on your ride.

But they talked me into trying the Grand Prix 4000 S at my local bike shop, explaining to me that it’s a lighter tire that is extremely grippy that is still almost as puncture resistant as the Gatorskins.

It sounds too good to be true, doesn’t it? How can it be light and grippy, and still have a long life and never flat?

One reason is the special “Black Chili” rubber compound developed by Continental. It grips well on both wet and dry asphalt, but somehow still doesn’t wear out quickly. I rode 10,000 miles in 2012 and only went through two sets of Grand Prix 4000 S tires. And I kept one of the front tires that I replaced, because it still has a enough tread that I could put another 1,000 or more miles on it if I ever accidentally ruin a tire and need a spare until I buy a brand new replacement.

The reason they never flat is a layer of Vectran, which is some material that is like Kevlar, but different. Maybe Vectran is not quite as puncture resistant as Kevlar, because the Gatorskin tires use Kevlar, and those are sold as Continental’s most puncture resistant tires. But I can tell you from experience that Vectran is good enough!

I typically ride thousands of miles without ever flatting. If I do flat on my Grand Prix 4000 S tires, it’s usually because I’ve ridden them after they have worn out to the point of replacement. At more than $50 per tire, you can probably understand why I like to get every last mile out of them before I change them.

Let’s talk about the expense of these tires. In my opinion, these tires are worth every penny. These are high end racing tires. They have very low rolling resistance. They only weigh just more than 200 grams. They stick like crazy in the corners, even when it’s wet. But they still wear out slowly, and they almost never flat. What other high end racing tires can you train on and not worry about wearing them out too quickly or flatting too often?

Don’t want to take my word for it? Check out what Tour magazine of Germany concluded after going through a comprehensive test of a huge number of different bike tire brands.

Grand Prix 4000S was the most consistant tyre with a weight of 207 grams on the test sample. Its rolling resistance measured in at 34.3 watts, beating even the lighweight race only tyres from the competitors.

The speed at which the GP4000S reached on the wet corner was 33 km/h, almost the same as our wet specific GP4Season, and higher than its main competitors. The time it took a sharp screwdriver to penetrate the GP4000s through the tread at a load of 35 kg was three minutes. In fact the test was stopped prior to any penetration as three minutes was defined by the magazine as a ‘pass’. Only two other brands also attained a pass grade here.

The Grand Prix 4000S comes in 700 x 23 and 700 x 25. I recommend the 700 x 25, which gives you an extremely plush, grippy ride with lower rolling resistance than a 23.

What? How can a wider tire have less rolling resistance? Sounds crazy, but it’s true. Read this article by Lennard Zinn on Velonews, and this other article that goes into more detail.

Here’s another secret that you’ll learn from those Velonews articles. Running a lower tire pressure also gives you lower rolling resistance than running them at maximum pressure. I run mine at 95 psi in the front and the back. Maximum pressure for the Grand Prix 4000S is 120 psi.

If you want to improve your ride quality, you won’t believe how much safer, smoother, and more comfortable you will feel riding a 700 x 25 tire at 95 pounds. Cornering is like riding on rails, and the ride is plush and less fatiguing than getting beat up by overinflated tires that are hard as a rock. And yet it still rolls faster! Try it, and you’ll never go back to max pressure again.

Do you agree with my choice for the best road bike tire ever? Disagree and think there’s a better bicycle tire out there? Leave a comment and let everyone know!

Best Presta / Schrader Bike Floor Pump Period for 2012 and 2013: Topeak Joe Blow Pro Bicycle Pump

Best Bicycle Pump Joe Blow Pro

Are you looking for the best bicycle pump made, bar none? Search no further, because I have found it for you. It is the Joe Blow Pro bike pump (aff), and it is better than any other bicycle pump I have ever used. Nothing I have ever owned has come close to this pump.

I bought this pump at full retail price with my own money during my search for the best bicycle pump. No one gave it to me. No one is paying me to tell you it is good.

If you are a bike pump manufacturer and you think you make a better pump than this, then send it to me and I’ll try it out and test it and tell everyone what I think. But you’d better have supreme confidence in your pump, because I can’t imagine how you could improve on this pump.

Let’s get into the details of the bicycle pump.

The absolute best feature of this pump is the Smarthead.

In the olden days of the 1980s and 1990s, you’d have to buy a pump and decide if you were going to own a Schrader pump (car tire style valve), or a Presta pump (racing bike style valve). The first big “advancement” was the ability to unscrew the head of a pump and flip a piece around and screw it back together, allowing you to use one pump to air up both types of tires. It was unwieldy and easy to break or lose parts, but it mostly worked.

Next came these “dual head” types of pumps, where there were two holes. Sometimes they were right above each other, and sometimes you’d have a Schrader on one side, and a Presta on the other. You could finally easily air up both kinds of tires without a lot of messing with the pump. This was about as good as you could get, and times were pretty good.

SmartHead

But the Smarthead is a whole new advancement. You have a single pump head. You stick it on the valve, whether it is Presta or Schrader, and then you pull the lever on the back of the pump head to lock it on the valve.

The Smarthead magically determines which type of valve you have and it just works! And it really does work, just as well as the marketing department would have you believe.

When you are finished, you flip the lever back down to release the pump head and you pull it off and hear the air release with a “pssst” sound when you take the head back off your tire valve, and your tire has been perfectly aired up.

It goes on and comes off easily, so you don’t have that terrible situation where you are in a hurry to go ride and you have to push the pump head on really hard to get it to attach to the valve and then you accidentally break off your Presta valve, or push your Schrader valve right through the base of the tube and lose all the air in your tire and now have to change a flat. Do you know how many pumps I’ve wanted to smash over the years that have done that to me? A lot of pumps.

joeblowgauge

The air gauge on this pump is also outstanding. First, they put it up high so that you can see it easily and see the pressure without bending over or squinting. Great usability. See that little yellow triangle? If you put that in the spot where you normally fill up to, it makes it even easier to pump up your tires. No looking at numbers at all — just wait until the gauge lines up and you’re done! Perfect if you do most of your riding on the same wheels and tires and keep a regular pressure. Easy to turn if you ever want to move it.

As you can see, the gauge goes up to 160 pounds, which is likely more pressure than you will ever need.

joeblowprorelease

See that little yellow button? That button is truly awesome. It allows you to bleed air out of your tire while the pump is still attached. You know how you can start pumping and get carried away and notice that you accidentally went 5 psi too high? You no longer have to take the pump off, let some air out, and then put the pump back on and find the right pressure again. You just bleed some air out, and you are done. It is very easy to control the air that bleeds out, so you can be very precise with it.

I used this pump for more than a year before I discovered this awesome yellow button! Boy am I dumb.

joe blow pro pump head holder

Don’t you hate it with a floor pump when you leave the pump head and the hose just sitting there on the ground like a snake, where it’s easy to step on, trip on, drive over with the car, etc? Well Topeak, with the Joe Blow Pro, made it so easy to put the pump head away that you’ll actually do it. It just goes right into a little hole and it stays there.

Topeak Joe Blow Pro handle lock

What’s this little black piece of metal? It’s a handle lock. If you grab the pump handle of most floor pumps and try to pick up the pump, the handle is just going to extend. But maybe you were trying to pick it up so that you could put the pump in your car to take with you to a bike race. If you flip the handle lock, it keeps the pump handle in place, even if the pump is lying in the trunk of your car. It’s not a crucial feature by any means, but it’s very thoughtful and just another small reason that this is the best bicycle floor pump ever built or designed.

What about durability?

The barrel of the pump is made of thick, polished aluminum. It’s solid, baby. You could thump a burglar in the side of the head with this thing, and he’d have to go to the hospital. You, on the other hand, could continue pumping up your tires while you waited for the police and ambulance to arrive.

I originally purchased this pump in November 2010. Mine is still like new, and I still love it as much as when I first bought it.

All that, with a full list price of $99, and a price on Amazon that is usually cheaper than $69. How can it be possible that something this well made could be this inexpensive?

Did I leave anything out? Leave a comment and ask me any questions you have.

Review: Stan’s Raven 700 x 35 cyclocross tubeless tire

Stan's Raven cyclocross (cx) tire, 700 x 35, tubeless


2012 is my second season of cyclocross racing. I first discovered cyclocross just last fall, when I borrowed a low end Specialized cx bike, finished in the back third of the pack, and loved every minute of it. Within a few weeks, I went out and bought an Orbea cyclocross bike, reviewed here.

That bike came with stock Vittoria cx clincher tires. I promptly blew out a sidewall on the front Vittoria in a race when I hit a root, riding through a muddy ditch. I replaced it with a Grifo Challenge clincher in the front, which is a perfectly good tire.

This year, though, I went tubeless on my 29er Specialized Carbon Comp mountain bike. I was really impressed by the difference in handling, and the lower pressures that I could ride without worrying about pinch flatting. I also love the idea of sealant instantly sealing up most flats, although I haven’t even punctured my Specialized mountain bike tires yet and have yet to see the sealant in action.

So when this cyclocross season rolled around, I started wondering about tubeless tire options for cyclocross.

I had first looked to see if Specialized had any cyclocross tires that they described as “2Bliss Ready,” which is their branded terminology for tubeless. But I didn’t see any of their cyclocross tires listed that way. So it was on to Stan’s tires, which I didn’t have any experience with, but trusted that they would seal up very well tubeless. I saw that Stan’s made a cyclocross specific and tubeless specific tire, and I figured I would try it.

I bought my tires directly from Stan’s.

My Orbea Terra bike has lower end Ksyrium Equipe wheels that were NOT tubeless ready. It’s evidently fairly easy to install Stan’s tape and convert wheels to tubeless yourself, but I took my bike to Dallas Bike Works and paid to have them convert the wheels instead. I didn’t want to do it poorly and make a giant mess with sealant, or end up with a tire that didn’t hold air well.

It turns out that I didn’t use Stan’s sealant with the tires. I ended up using Caffelatex sealant instead, because I have had a good experience with that sealant in my 29er mountain bike tires.

When I first got the bike back, the rear tire held air very well, but the front tire was losing 10 to 20 pounds of pressure overnight. Eventually, it sealed up all the way. Both tires still lose pressure faster than my big 29er tires. They might go down 5 pounds in a night until they get into the low 20s, where they will tend to stay. But I believe this is common with tubeless cyclocross tires, because there isn’t as much air volume in the skinnier tire, so pressure goes down faster.

The Raven tire is a 35 mm tire, which gives it more grip in the dirt than the 32 mm Grifo tire, or the 32 mm Vittoria. It has a very fast tread pattern though, and I find that it rolls extremely well, even on pavement.

One of the first things I noticed about the tire was how low you can run the pressure, according to Stan’s. If you ever look at most clincher cyclocross tires, they’ll always have crazy sounding “minimums” of 45 or even 65 pounds. I actually took those minimums at face value for a couple of races in the beginning of my cyclocross days, and bounced and skidded all over the place. I now believe that those minimums must be decided by lawyers, and not manufacturers.

The Stan’s Raven tubeless cx tires have a minimum of 22 pounds, and a maximum of 65 pounds. To give you an idea of how low that is, I run 28 pounds on my huge volume 2.2 29er tires — and that’s running them tubeless! So 22 pounds as a minimum sounded incredibly low to me.

When I first started riding them on a cyclocross course, I set them at around 28 to 30 pounds, both in the front and the back. (I weigh 150 to 155 pounds.) The tires were grippy, and they didn’t bottom out to the rim when I rode over rough stuff. Seemed like a good pressure.

Not being able to leave well enough alone though, I decided to go even lower. At the second week of the Woodcreek race series, I went for 26 or 27 pounds, both in the front and the rear. It went very well during the warm up, and it seemed like this was going to be a better pressure for me.

But during the race itself, disaster struck and I “burped” the rear tire on a hard corner, losing a large amount of pressure. I was in second place in the C race at the time, and feeling great. I slowed down in the corners because of the mushy rear tire, and was overtaken and dropped back to third place. With only two laps to go, I thought I was going to make it to the end in the top three. But I leaned too hard into a corner again with very that low pressure and lost all the rest of my air and dropped out. (I didn’t have any spare wheels in the pit.)

Before I went tubeless on my mountain bike, I had never heard of “burping a tire,” so I’ll explain it in case you aren’t familiar with it. Basically, since you have no tube, you are sealing in all the air directly in the tire and wheel. If you run your pressure too low and lean too hard into a turn, the force of your turn can unseat the bead of the tire from your rim enough to let a small (or large) amount of air leak out. It makes a weird noise when that happens, which I imagine is why they call it a burp.

So after that experience, I would say that 22 pounds might be a legitimate low pressure for a front tire. But for the rear tire, it does not work for me, with that tire and wheel combination and my style of riding.

Since that incident, I went back to 29 pounds, front and back. I’m probably going to try 26 or 27 on the front tire again, but won’t go lower than 29 in the back.

[Update on the front tire. I raced at 27 pounds in the front, and ended up burping the front tire when someone ran into me from behind in a technical turn and knocked me down in a forward direction, putting a sudden heavy pressure on the front tire at an angle. Since then, I’ve gone up to 29 to 31 in the front, and 31 to 35 in the back and have not burped either tire again.]

One great thing about these tires is that I’ve been able to corner hard enough through loose dirt to drift the front tire and lose grip, but still hook back up again. On my Vittoria and Grifo tires (which I had to run at a higher pressure because of the tubes), sliding out the front tire was almost always the precursor to a crash, or at least an unclipping of my inside pedal to dab my foot.

I have not flatted these tires yet, or even caused the sealant to seal up any small punctures.

I ride them on the road sometimes, but the tread is still holding up very nicely. I think Stan’s chose a very good balance of grippy rubber that doesn’t wear out too quickly.

Overall, I recommend these tires if you are looking to go tubeless. Tubeless is a much cheaper and more practical option than buying a set of tubular wheels and very expensive tubular cyclocross tires, just so that you can run your pressure lower than a clincher.

Have you ridden these tires, or do you have questions about them? Leave a comment with your feedback or questions!

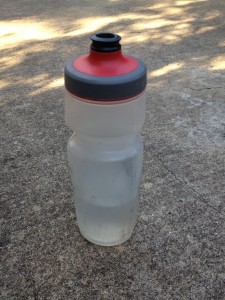
Review: Specialized Purist HydroFlo 23 ounce water bottle

I’ve gone through a lot of water bottles since the 1980s, when I first started cycling. Back then, water bottles were pretty much all the same, for years and years. A really small top connected to the bottle with a piece of plastic, which made it hard to clean the bottle and hard to add any ice to the bottle if you liked to keep things cool in hot weather.

One of the more recent advances in water bottles was when Camelbak came out with their first traditional water bottle (as opposed to hydration packs). Named the Camelbak Podium, it was a bottle with an extremely wide mouth, and a terrific valve that you could twist to keep completely shut (and leak free). The valve was also very soft and easy on your teeth.

That first generation of Podium bottles was perfect except for two fatal flaws, in my opinion. The first flaw was that the plastic was too slippery, so it was very easy to drop the bottle out of your hand. And the second fatal flaw was that the flow rate was much too slow. The plastic was quite hard, so you’d really have to squeeze it to get much water out of it at all. I think this is also part of the reason it was so slippery. I think they have probably resolved those issues with subsequent generations of that bottle, but I wasn’t willing to spend the money to try them again. I will say that their lid and valve design is world class!

This is the standard 26 ounce Specialized Purist water bottle, which is almost as good as the HydroFlo.


I picked up my first redesigned Specialized water bottle a couple of years ago, at Bicycle Sport Shop in Austin. It was a 26 ounce Purist water bottle, which was the best water bottle I had ever used at that point in time. I bought five or six of them over the next year.

The plastic was a good thickness so that you could get plenty of water. It was also a good type of plastic that wasn’t too hard to squeeze, and would easily stay in your hand without getting too slippery. And it had a new type of lid and valve called the Watergate, with the self sealing “Heart Valve.” Those two terms are a bunch of marketing speak, but they do describe a truly better design. You can keep the valve of the water bottle open and turn the bottle upside down, but water would not leak out until you actually squeezed the bottle.

If the way the valve worked wasn’t awesome enough, they also made it so that a generous stream of water came out when you did squeeze it. This was a terrific bottle, and I didn’t think that you could really make anything better than the Purist.

But I was wrong.

Because a year or so after I discovered the Purist and was using it exclusively, I spotted a DIFFERENT Specialized water bottle at the bike shop. It was slightly smaller than the Purist. It had the same amazing lid and valve. But when you picked it up, it felt rubbery and soft and awesome in my hand. It was even grippier than the Purist, and it could squirt water out even faster with the softer material.

This new bottle, of course, is the Specialized Purist HydroFlo 23, which holds 23 ounces of liquid instead of 26 ounces. Although I’d love to have 3 more ounces of liquid, I am willing to settle for less to use this terrific bottle.

An unusual feature about this bottle is that it isn’t round. It is a three sided bottle, sort of like a rounded off triangle. You don’t really notice that it isn’t round, except that the rounded corners fit really well in your hand, giving you a superior grip.

The reason that Specialized calls these bottles “Purist” is because they supposedly have some kind of coating or plastic design or something that keeps them from getting that disgusting “funky water bottle” taste that you sometimes get with older water bottles.

I’ve found that they clean out pretty well. When I use them with Hammer Nutrition HEED or Perpetuem, I typically just rinse them out with cold or hot water as soon as I am finished with my ride, and then leave them upside down to drip dry before my ride the next day. If I fill them up with water the next day instead, they are typically taste free unless I did a bad job of rinsing them out.

Every few weeks I’ll run them through the dishwasher, just to make sure they get a real cleaning every once in a while.

I’m going to quote some of the stuff that Specialized says about the bottle.

FLEX: Thanks to ultra flexible walls, Hydroflo delivers a tidal wave of water. The secret is our next generation resin, engineered to be durable, super flexible and ultra clear. A fine-tuned design provides increased leak resistance and ensures the bottle stays in your cage, even on the toughest roads

SAFE: Hydroflo is 100-percent recyclable, FDA approved, BPA free and indpendently tested and approved by SGS.

FIT: Hydroflo’s unique, three-sided shape fits perfectly in your hand for a solid, controlled grip. The design reduces the chance you will drop your bottles through a perfect ergo hold.

PURE: To deliver a pure water taste, Hydroflo is infused with Purist. Using technology inspired by nature’s lotus leaf, Purist shields the bottle from odor, staining and mold buildup, so all you taste is pure water every time.

I want to make it clear that I paid full retail price at a bike shop for all of my Specialized water bottles. I am not writing this because someone asked me to, or because someone gave me free bottles in exchange for a review. I genuinely love the Purist HydroFlo 23!

You should go buy a couple right now, and then leave a comment on the blog after you have tried them for yourself. My guess is that you’ll be thanking me in the comments.

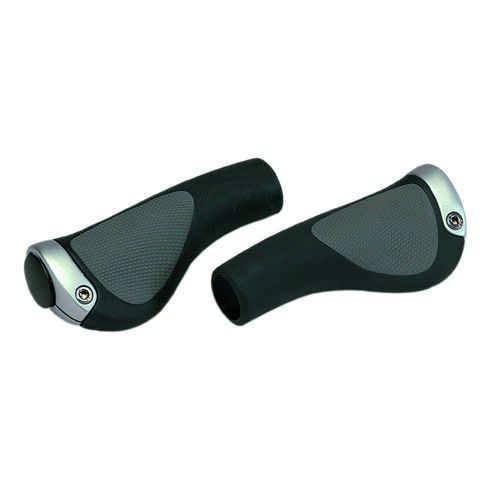
Review: Ergon GP1 Large mountain bike grips

Ergon GP1 mountain bike grips

I bought a pair of Ergon GP1 mountain bike grips after attending a Carmichael Training Systems Leadville camp in August of this year.

During the camp, we rode most of the Leadville 100 mountain bike course, split up over a period of two days.

On the very first day, my hands were cramping up on the descents at the end of the day, and we only rode about 40 miles. I was concerned that during the Leadville 100 race, I would almost certainly have more cramping problems and/or really sore hands with the stock grips that came on my 2012 Stumperjumper Carbon Comp 29er.

I first saw a pair of the grips in the bike shop in Leadville, while attending the camp. And then I saw them mentioned again in one of the Leadville pre-race emails, by Dave Weins. He is sponsored by Ergon, and he evidently uses the other model grips that have built in bar ends.

I was not interested in the version with bar ends, but I did really like the shape of the Ergon grips in general. With the almost paddle-like shape, they looked like they would give a much larger area of support for my hands.

Although everyone tells you not to make any last minute changes to your bike before Leadville, I bought a pair of the GP1 grips just 10 days before the race, only giving myself a few days to adjust to them.

The grips are very easy to install, with only an allen wrench. The only caveat to this is that the grips mention a very specific Newton Meter (nM) setting for how tight you should tighten them when you install.

I own a terrific Topeak adjustable torque wrench, because I have a carbon road bike and carbon cyclocross bike. So it was fortunately just a matter of setting the torque wrench when I put on the grips. If you don’t have a torque wrench, you’ll want to borrow one, or have the grips installed at your local bike shop so that you don’t over-torque and ruin them (or your bars).

The instructions are very clear for the steps of the installation. Basically, you just slide them on and tighten them down. Pretty simple.

One thing you will probably want to adjust when you install them is how you want them angled. The instructions cover the best approach for the angle to avoid wrist strain. Unlike a round grip where it doesn’t matter, you can really make these grips uncomfortable if you tilt them too high or too low.

I followed the guidelines in the instructions, and then tweaked them by a few millimeters over the course of riding with them for two or three days.

So how did they work on my 11 hour and 42 minute Leadville ride? Terrific! I had no hand cramps, and no hand pain to speak of.

I recommend Ergon grips with complete confidence and no reservations.

Try them!